
The GitHub platform is used by over 52,000 companies worldwide, including Team DataMotion. Why, you might ask? Because GitHub’s source code management and version control functionalities make it super-easy to add and contribute to your projects. For developers working in a group and sharing responsibilities, it’s essential to push code changes quickly and efficiently. As we know all too well, delays can have a ripple effect as others on the project may need your work to be completed before moving forward.
By enhancing your version control knowledge, you can quickly add new features and bug fixes to a project and avoid these slowdowns. In addition to efficiency, by building your GitHub knowledge you can take the incentive to ensure there are other controls in place on your repositories, such as security policies and safety nets. With cybercrime and insider threats on the rise, DataMotion and many other large corporations consider these security features to be essential for any GitHub repository.
Four More Tips to Improve Your GitHub Experience
To help you build this knowledge, the development team here at DataMotion has put together a list of tips and tricks to help you utilize GitHub to its fullest potential. If you are just joining in, this blog post is the second in a two-part series summarizing the tips we’ve shared over social media. You can find a quick GitHub overview, as well as the first of the series of tips and tricks, in our first blog post.
These tips are intended to enhance an already-basic knowledge of the GitHub platform, but for those of you who are still pretty new to GitHub and would like more information on how to get started, we recommend you visit their quick start guide. Otherwise, let’s continue and review four new GitHub tips that will help secure your repositories, increase efficiency, and enhance collaboration.
GitHub Tip #5 – Limit Repo Access
The fifth tip in our series is to limit who has access to your repositories. Limiting who has access is an important security strategy known as a Least Privilege Model (LPM) implementation. In essence, you are allowing only those who need access to the repository to have that access and therefore are cutting down the possibility of an insider threat.
The first step is to ensure the visibility of the repository is set to private, rather than the public setting that grants everyone access by default. To do this, navigate to the repository you would like locked down. Once on the repository, select “Settings” then scroll to the bottom of the screen where you will find a “Danger Zone” section. In this section, select “Change Visibility” and choose the “Make Private” option.
Once your repository is private, you will be the only user with access. From here, you will want to assess who on your team should also have it, then make them a contributor. You can do this by scrolling to the top of “Settings” and choose “Manage Access” on the left-hand side menu. A new page will display; in the page select the green “Add People” button within the manage access section.
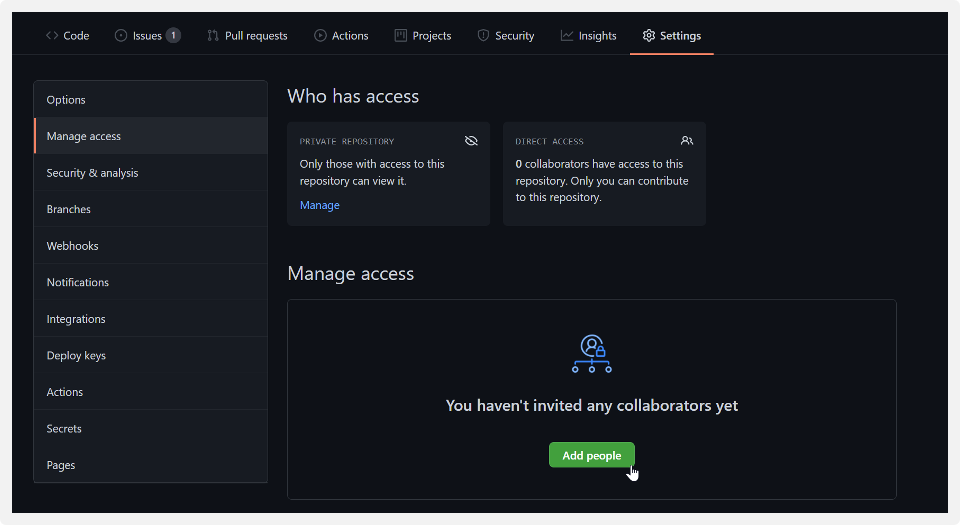
From here, you can search for the persons you would like to have access and contribute to your project.
Now only those who need access to your project will have it, reducing the chance of an insider threat.
GitHub Tip #6 – Scan Your Code
Continuing with security and efficiency in mind, our next tip is to scan your code once it is added to your GitHub repository. You can utilize CodeQL (or another third-party tool from the marketplace) to set up code scanning. This means CodeQL or another third-party scanning software program will crawl your code and identify errors or possible vulnerabilities within your code once it is pushed to GitHub. Note: CodeQL does have compatibility with VSCode as well.
When using CodeQL, these vulnerabilities and errors are found using queries. You can utilize queries created by GitHub and community contributors or create your own to use during these scans. Scans may identify errors in data flow, structure, and syntax. Custom queries can be used to search for errors unique to your organization, such as a query that may search for instances of a deprecated company URL. Searching for these vulnerabilities will keep your code clean and help thwart attacks in the future.
GitHub Tip #7 – Scan for Secrets
In addition to scanning for vulnerabilities, you can tighten security by scanning for secrets as well. To configure this setting within GitHub, navigate to your repository and select “Settings” followed by “Security and analysis”. Then, next to “Secret scanning” click “Enable”.
Doing so will ensure that no sensitive tokens or private keys that may grant permissions are pushed to your current repository. Therefore, you can ensure that sensitive data, as well as permissions, stay locked down.
Quick Note: This feature is automatically enabled for all public repositories (thankfully!). For private repos, you will need an advanced security license to enable this feature.
GitHub Tip #8 – Compare Repo Versions
While developing and continuously pushing project changes, you may find that you need to look at changes on a specific branch of your repository and compare it to the main branch. Therefore, our last GitHub tip in the series is how to efficiently do this from the version control platform.
To compare repository changes with another branch, add “/compare/branch1..branch2” to your repo path. For example, you can navigate to github.com/HeatherPost/GitHubTesting to see our latest repository. Then navigate to github.com/HeatherPost/GitHubTesting/compare/main..TestBranch to see the changes made on our test branch.
There is also the ability to compare two commits as well. To do this, use two dots to separate the version numbers. For example to compare commitA and commitB you would navigate to github.com/HeatherPost/GitHubTesting/compare/commitA..commitB.
Final Thoughts
Congratulations! You are on your way to becoming a GitHub master. With these tips and your new skills, you can now add security and efficiency features to your GitHub repositories and code. As a final tip, we recommend trying each of these suggestions out on a test repository before implementing in your current and future projects. Once you’ve had a chance to test drive these tips for yourself, you will be ready to go!
We’ll be back soon with the next series of tips and tricks, which are all geared toward enhancing and broadening your skillset. These will be posted on DataMotion’s Twitter, Facebook, and LinkedIn pages every Tuesday. As always, we will be sure to summarize each set of tips in an easy and convenient blog post. Keep an eye out!
You can find DataMotion’s open-source projects, Postman collections and libraries on our GitHub. To find out more on how our secure message APIs can help you, visit datamotion.com today!