
In this blog series, you’ll learn how to use the DataMotion secure message center APIs. We’ll start with the basics of getting a session key and sending a message, then explore a wide range of additional functionality. To make this series quick and easy to follow, we’ve broken it up into a few, easy-to-consume parts. This first part should only take you a few minutes, so you can start brewing a pot of coffee and celebrate with a fresh cup when your code is done.
For those who aren’t familiar with this family of DataMotion APIs, they make implementing modern secure document and message exchange in your mobile apps, portals, and workflows easy and fast. It’s a win-win – you get the secure features you need while having extra time to focus on other features that make your app best-of-its-kind.
There are many use cases where our secure messaging APIs have saved the day, ranging from enabling client to advisor exchanges in wealth management apps, to the exchange of medical results for clinical trials. Now, customers can say goodbye to muzak on hold, stamps, faxes or trips to see their advisor. Instead, they’ll be saying hello to securely getting business done in record time.
Now that you have a better understanding of what these APIs can do, let’s begin with the first part of this tutorial. We’ll start with showing you how to get a session key and send your first secure message.
First Things First…
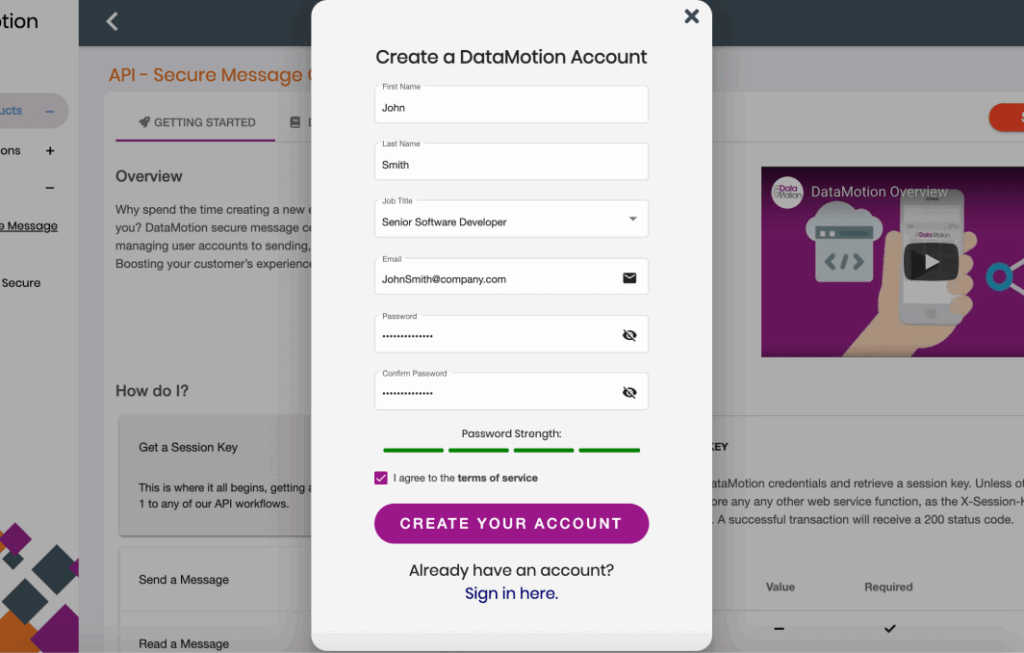
There are a couple of things you will need to confirm prior to diving into this tutorial. First, in order to get a session key and send your first message, you must be signed up for a DataMotion developer account. If you don’t have one yet, you can fill out the form that pops up to “Create a DataMotion Account” when clicking the “Login” button at the top right corner of the self-service center. Upon completion of this form, you’ll begin a free 120-day trial of our secure message center APIs and you’ll be ready to move on to the rest of this tutorial. So, let’s get started!
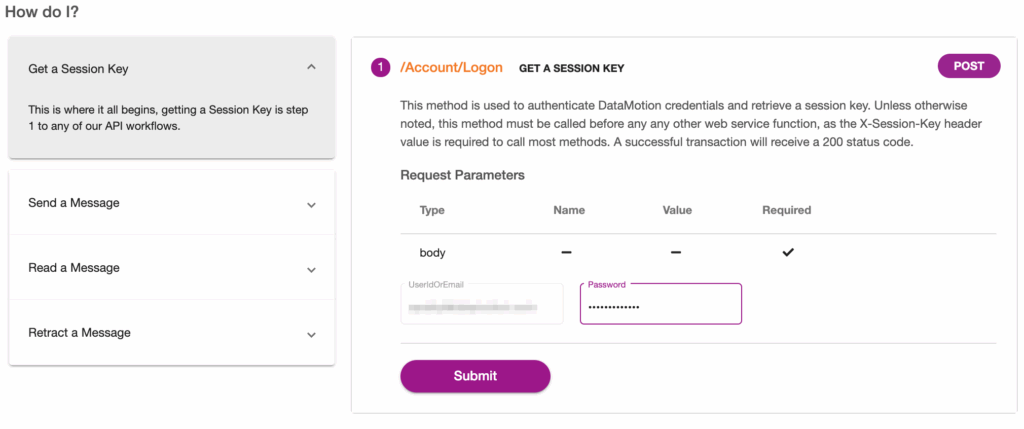
Get a Session Key
Before calling any of the functions in this suite of APIs, you’ll need to get a session key. A session key verifies a user’s account credentials, so the system knows it’s actually them when making API calls. To get a session key, your users will enter their UserIDorEmail and Password. In this example, use the ones that you established when creating your developer account and enter them into the body of your HTTPS request. Then click the Submit button.
A successful response will return a 200 Status Code with a Response BODY:
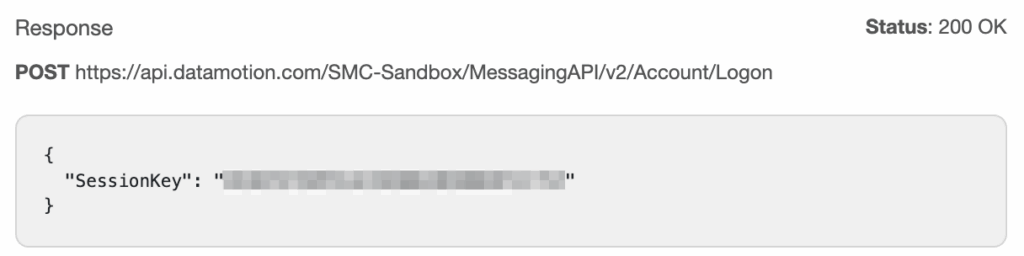
To keep things secure (that’s what we do), this session key will expire after 30 minutes of inactivity on an account.
It’s important to take a quick step back to discuss this process of getting a session key in a little more detail. For the purposes of this tutorial, we asked you to simply input your UserIDorEmail and Password. However, this isn’t the only method to verify your identity with our services. We also support single sign on and integrations with public or private identity providers, such as SAML, to establish and verify a user’s identity.
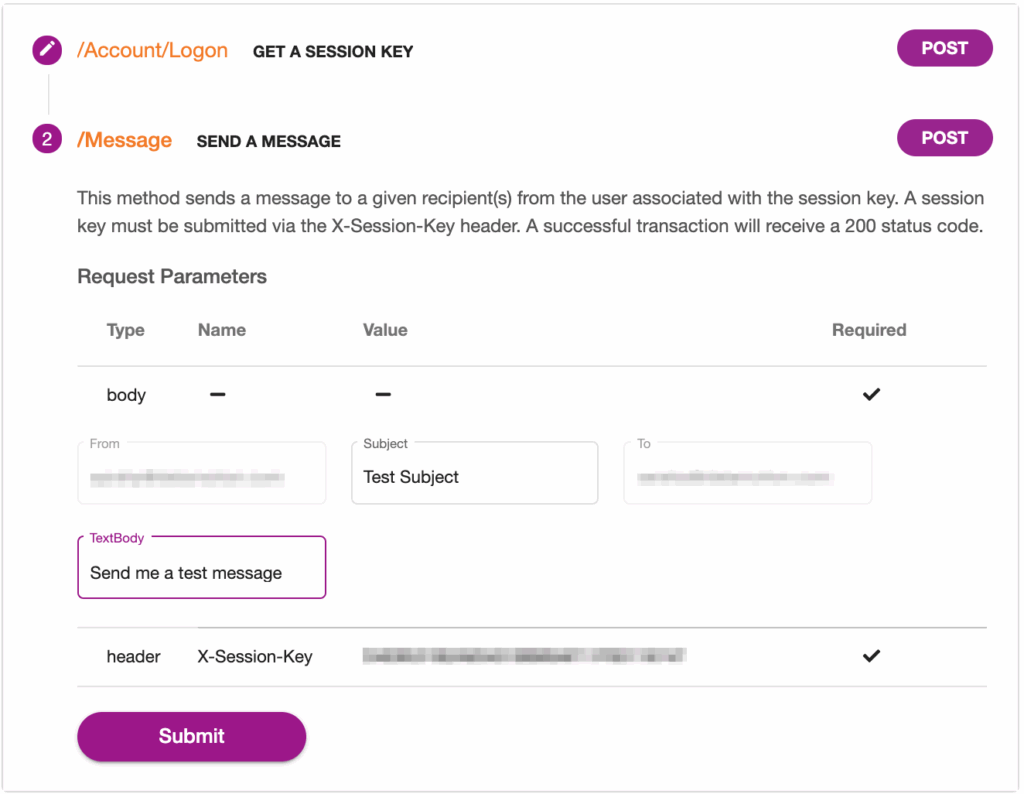
Send a Message
Now that you have a session key, keep it handy. We will be adding it as a custom header value to every other DataMotion secure message center API call we make. Alright, so let’s send your first message.
Using the same “How Do I?” module, you’re going to move down to the tab labeled “Send a Message.” First, to make things easy, you’ll notice that the “To” and “From” fields are already filled out for you using the email address associated with your DataMotion account. All you’ll need to do is fill out the Subject and the TextBody, then click Submit to send your message.
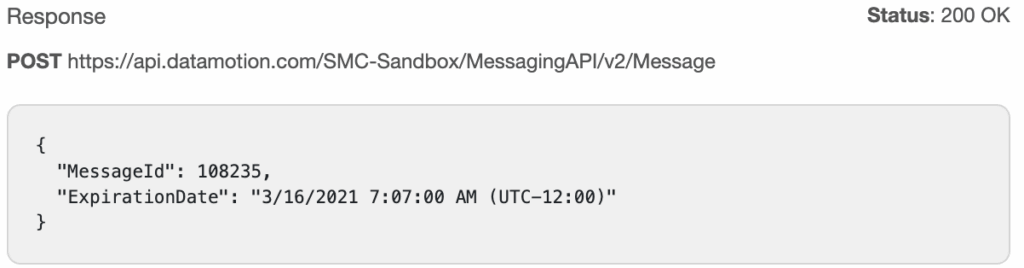
If your secure message sends successfully, you will receive a 200 status code along with your message ID and the message expiration date. Because the “To” field was pre-populated with your email address, you will receive a message waiting notification in your inbox. A successful request will look similar to the following:
What’s Next?
Take a bow! You’ve successfully gained access to the API, established a Session Key and sent a message. It’s a great time to treat yourself to that fresh cup of coffee!
You’re now ready to move on to the next step. In the next part of this blog series, we’ll show you how get your message summaries and how to read a message.
In the meantime, you can read up on our Get a Session Key and Send a Message documentation for the secure message center APIs in our developer center.
Interested in learning more about how the DataMotion secure message center APIs can help your enterprise? Contact us to learn more.